Wednesday, 22 April 2015

Google finally unveils ‘Project Fi’ wireless service


After months of rumors and years of speculation, Google has finally announced its own mobile carrier initiative. Google’s Project Fi isn’t a new network, but rather a new type of Mobile Virtual Network Operator (MVNO) that combines the networks of multiple carriers and leans heavily on WiFi hotspots to streamline the experience. Project Fi is now accepting invitation requests, but at this early stage there are a whole mountain of caveats.
Project Fi will connect your device to 4G LTE on either Sprint or T-Mobile, depending on which signal is better in your current location. If there’s an open WiFi hotspot nearby, your device will automatically connect to that. Only WiFi that has been identified as being of decent quality will automatically connect, and you can always shut off WiFi if you like. When you are connected to a WiFi network, your calls will be routed over that connection, and Project Fi will fire up a VPN automatically to protect your data.
That’s the basic premise of Project Fi. But what about the cost? The basic service with unlimited talk and text is $20 per month, and then you add data on top of that. You only pay for the data you use, and there’s no such thing as wasted bytes. It’s $10 per GB, and anything you request, but don’t use, will be refunded to you on your next bill. Say you think you’ll use 2GB of data, but you only use 1.2GB. On your next bill, you’ll get a credit of $8.
The cost is great if you don’t use a lot of data, which is the goal of Project Fi. Google wants you to connect to viable WiFi hotspots whenever possible. There’s no unlimited data option, and the rate doesn’t adjust downward as you buy more data. T-Mobile and Sprint both offer cheaper data once you get past 5GB or so, but AT&T and Verizon are still a little more expensive until you go above 15GB. Project Fi also includes free international roaming (at reduced speeds), and integrates with Hangouts for calling and texting on non-Fi devices.
Fi
Perhaps the biggest benefit of Project Fi is that you can switch between Sprint and T-Mobile, although both have less expansive coverage than Verizon and AT&T. If you combine the two, it’s actually pretty respectable, and you can always connect to whichever one is faster wherever you are. Of course, this unique network switching feature limits your phone options significantly. The only device supported at launch is the Nexus 6.
If you don’t already own one of Google’s latest flagship smartphones, you can buy one when signing up for Project Fi. It’s $649 to $699 if paid all at once, or you can pay for it over 24 months — $27.04 per month for the 32GB option and $29.12 per month for the 64GB. The Nexus 6 is unlocked, but so are plenty of other phones. The reason Google is limiting Fi to this device right now is that it supports a huge number of LTE bands (12 of them according to the specs). Google also has more control over the Nexus’ software to make sure Project Fi works properly.
Google is rolling out a small number of Project Fi invites every week. You can sign up on the official website. Just make sure you’ve got coverage where you live.

Monday, 20 April 2015

விரைவில் மூடப்படுகிறது 'பிளிப்கார்ட்' வெப்சைட்!

அண்மையில், பிரபல ஷாப்பிங் வெப்சைட்டான 'மிந்த்ரா' மூடப்பட்டதையடுத்து ஆன்லைன் வர்த்தகத்தின் ஜாம்பவானாக திகழ்ந்து வரும் பிரபல 'பிளிப்கார்ட்' வெப்சைட்டும் இந்த ஆண்டுக்குள் மூடப்படுகிறது. தொடர்ந்து பிளிப்கார்ட் இணையதளத்தில் ஊகவணிகங்கள் அதிகரித்து வருவதால் இந்த முடிவு எடுக்கப்பட்டுள்ளதாக பிளிப்கார்ட் வெப்சைட்டின் துணை அதிபர் மைக்கேல் அதானி தெரிவித்துள்ளார். 

உலக அளவில் 3-வது மிகப்பெரிய ஷாப்பிங் சைட்டாக உள்ள பிளிப்கார்ட்டுக்கு 4 கோடிக்கு அதிகமான பதிவு செய்த வாடிக்கையாளர்கள் இருக்கிறார்கள். மொபைல் ஆப்ஸ் வழியாக இதுவரை 20 கோடிக்கும் அதிகமான பொருட்களை 30 ஆயிரம் வியாபாரிகள் மூலம் விற்பனை செய்திருக்கிறது பிளிப்கார்ட். இந்தியாவில் மட்டும் 24 கோடி வாடிக்கையாளர்களை கொண்டுள்ள பிளிப்கார்ட்டில் ஸ்மார்ட்போன்கள் குறைந்த விலையில் கிடைப்பதாக பொதுவான கருத்து நிலவி வருகிறது. 

இந்நிலையில், அதிகரித்து வரும் ஷாப்பிங் காரணமாக வெப்சைட்டில் டிராபிக் அதிகமாகி அடிக்கடி ஸ்தம்பிக்கும் நிலை ஏற்பட்டுள்ளது. கடந்த ஆண்டை விட 10 மடங்கு ஆன்லைன் டிராபிக் அதிகரித்துள்ளது. இந்த சவாலை சமாளிக்க மொபைல் ஆப்ஸ் வழியாக பிரத்யேக பிளாட்பார்மில் இனி வர்த்தகத்தை வழங்க முடிவு எடுத்துள்ளது. மாதத்திற்கு 8 கோடி ஆர்டர்களை வினியோகித்து வரும் பிளிப்கார்ட்டுக்கு 3-ல் 2 பங்கு ஆன்லைன் டிராபிக் சிறிய நகரங்கள் மற்றும் கிராமங்களிலிருந்து மட்டுமே வருகிறது. மிந்த்ராவின் மொபைல் ஆப்ஸ் வளர்ச்சி பிளிப்கார்டை விட அதிகமானது. கடந்த ஆண்டு மிந்த்ராவை ரூ.2 ஆயிரம் கோடிக்கு கையகப்படுத்திய பிளிப்கார்ட் வரும் மே 1-ந்தேதி முதல்  மொபைல் ஆப்ஸ் மூலமாக மட்டுமே வர்த்தகத்தை வழங்குகிறது. அதே பாணியை இனி பிளிப்கார்ட்டிலும் கடைபிடிக்க தயாராகிறது.

How to Put Google Adsense Below Post Title in Blogger?

Adsense is the first choice of many expert bloggers for their blog monetizing because it is a contextual based ad which shows relevant to the content. To increase the ad revenue webmasters try various ad spot on their blog to get maximum output from their advertisement programs. You might have observed an ad below post title in most of the big blogs. Why they prefer adding ads below the post title? It is because the spot just after the post title is the best place to put ads to increase Click Through Rate (CTR). But you should not rely on what other follows. You should keep trying to add adsense at various locations to check which spot works best for you.

Come to our today’s tutorial which is about how to show Google Adsense Ad below post titles in blogger. So, let start the tutorial.
google adsense blogger
Put Google Ads Below Post Title in Your Blogger Blog :)

Creating Google Ads

  1. Go to your Google Adsense account.
  2. Create a new ad unit.
  3. For better results choose wide area ad sizes like 300*250 Medium Rectangle or 336*280Large Rectangle.
  4. Customize your ad colors and click on save and get code button.
  5. Select Synchronous in the code type and copy the ad code
  6. Now parse this code using this HTML Parse Tool to change special characters into their corresponding HTML entities. The ads won’t appear if you use that code directly.
  7. Now copy the parsed code.

Adding Google Adsense in Blogger Below Post Titles

  1. Go to Blogger >> Template.
  2. Note: Take Backup your blog template before doing any changes
  3. Click on Edit HTML button.
  4. Copy all the template code and paste it to notepad file
  5. Press Ctrl+F and search for
<data:post.body/>
  1. Now paste below code just above it.
<b:if cond='data:blog.pageType == &quot;item&quot;'>
PLACE YOUR AD CODE HERE
</b:if>
  1. Replace PLACE YOUR AD CODE HERE with your parsed ad code.
  2. Click on save template button.
  3. You are done!
NOTE: Based upon your template, there are chances that you find multiple instances of<data:post.body/>. So try with all of them.
Once you performed these steps then visit any of your blog posts. Ad below post title will look something like this:
adsense ad below post title
The ad below post title will appear at the left side. If you want to show it at the right side or at center then use below code.
<b:if cond='data:blog.pageType == &quot;item&quot;'>
<div align=”center“> // Please type this line manually. It can give you an HTML error.
PLACE YOUR AD CODE HERE
</div>
</b:if>
If you are unhappy with the results and want to wrap text around Google adsense ads like this:
adsense ads alignment
then use below code.
<b:if cond='data:blog.pageType == &quot;item&quot;'>
<div style=”float:left; margin:10px;”>
PLACE YOUR AD CODE HERE
</div>
</b:if>
Replace left to right if you want to show ads on the right side wrapped with text.
Note: Observe that all of the above codes are added between conditional tags which will show ads only on post pages neither on homepage nor on labels page. If you want to show ads on every page then remove those conditional tags.
If you are showing ad on homepage and label pages also then take a look on your ad. It will be shown below all post’s titles means if you have set 5 posts to appear on your homepage then it will only appear below first 3 post’s titles. Last two will be shown as blank white space. I recommend you to show ad below first post title only. Replace above conditional tags with below ones to show single ad on homepage and labels page below first top most post’s title.
<b:if cond='data:post.isFirstPost'>
PLACE YOUR AD CODE HERE
</b:if>

It’s Your Turn!

These were all the ways to put Google Adsense ads below post title in blogger. Now it’s your turn to check which format works best for you. If you want to increase your ad revenue then you have toincrease your blog traffic. Read these two posts on 6 “blog optimization tips” and an ultimate guide of “Search Engine Optimization Tips for Bloggers” which will help you to gain more traffic from search engines to increase Adsense income. Please share your views with me on increasing Adsense CTR and revenue through comments. Happy Making Money!

Google Now Lets You Download Your Entire Search History, Here is How To Do This

Google now allows you to export and download your entire search history in no time. Last year Google tested a download feature in search history and it appears that this feature is now available for everyone.
Some of us might think that what is the need of this feature? But let me remind you, no one wants to leave a trail of their Google search behind, and this is an efficient way to check what Google is storing behind you.
This feature was disovered by a blog and it tells that Google now lets your export all your search history to Google Drive and then you can download the searches in a ZIP archive form. The files in the ZIP archive are arranged by year and quarter.

Here is how to download your Google search history, take a look:

How To Download Google Search History?

Step 1.
To download your search history, first you need to sign in to that account then head on over toGoogle Web HistoryNow Click on the gear button and click on download.
google-history-download

Step 2.
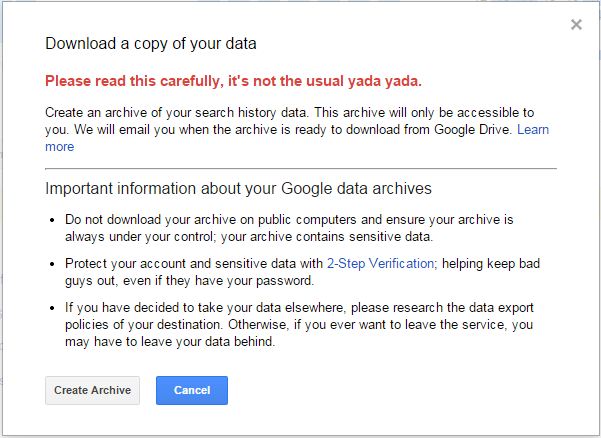
Now Google will display you a warning as your Google search history may have some sensitive information.
It’ll be good if you are not downloading your search archive at public or shared computer. Now click on Create Archive.google-history-dowload-warning

Step 3.
Now open your Gmail account and you will find an Email, open it and you can download your Google search history from there.


google-history-download-email

செல்போன் தொலைந்து விட்டதா? கவலைப்படாதீர்கள் இனி கூகுளில் போனை தேடிக்கண்டுபிடிக்கலாம்

ஆண்ட்ராய்டு ஸ்மார்ட் போன்கள் தொலைந்தால், இனி கூகுள் தேடுதளத்திலேயே அவை எங்கிருக்கிறது என்பதை தேடி கண்டுபிடிக்க முடியும். 

கூகுள் நிறுவனம் மிகத்திறமை வாய்ந்த தேடுபொறி தளத்துடன், தொழில்நுட்ப உலகில் களம் இறங்கியது. அதன்பிறகு படங்கள், வரைபடம், செய்திகள், மொழி பெயர்ப்பு என எண்ணற்ற வசதிகளை தந்து இணைய உலகில் ஜாம்பவானாக விளங்கி வருகிறது. தற்போது ஸ்மார்ட் போன்கள் தொலைந்து போனால் கூகுளில் தேடி கண்டுபிடிக்கும் வசதி அறிமுகம் செய்யப்பட்டுள்ளது. 

இதற்கென பிரத்யேகமாக ஒரு அப்ளிகேசன் உருவாக்கப்பட்டு இருக்கிறது. இதை உங்கள் செல்போனில் நிறுவிக்கொண்டு, அதில் கூகுள் கணக்கின் வழியே உங்கள் ஸ்மார்ட்போன், டேப்லட், கணினி ஆகியவற்றின் தகவல்களை பதிவு செய்து வைக்க வேண்டும். பின்னர் எப்போதாவது போன், கணினியை வைத்த இடம் மறந்துபோனாலோ அல்லது தொலைந்து போனாலோ அவற்றை எளிதாக தேடி கண்டுபிடிக்கலாம். 

இதற்கு இருந்த இடத்தில் இருந்துகொண்டே வழக்கமாக கூகுள் தேடல் பக்கத்தில் ‘பைன்ட மை போன்’ (Find my phone)  என்று தட்டச்சு செய்தால் போதும், உடனே ஒரு வரைபட திரை உருவாகும். அதில் தொலைந்த ஆண்ட்ராய்டு செல்போனின் தகவலை குறிப்பிட்டால் அது எங்கிருக்கிறது என்பது பற்றிய தகவல்கள் சில வினாடிகளில் திரையில் காட்டப்படும். நீங்கள் இருக்கும் இடத்தில் இருந்து எவ்வளவு தொலைவில் உங்கள் போன் இருக்கிறது என்பது காட்டப்பட்டு விடும். ஒருவேளை உங்கள் பொபைல் கண்டுபிடிக்க முடியாத இடத்தில் இருந்தால் அதில் இருக்கும் ‘ரிங்’ என்ற வசதியை பயன்படுத்தி, உங்கள் மொபைலை செயல்படாமல் பூட்டி வைக்க முடியும். தேவைப்பட்டால் போனில் உள்ள தகவல்களை அழிக்கவும் செய்யலாம்.